
Introduction
After all these years spent secretly refusing to welcome Docker into my self-hosting journey, I finally switched to a Docker Compose Stack - way of managing most of my applications. Probably because I was bored, Debian is too stable.
Also, I love XMPP. I use this protocol every day to chat with my friends. This is why I have been hosting a Prosody server for a while now. And while we are making the presentations, let me not introduce, because you already know him: Gajim.
This article will guide you through the process of deploying a Prosody XMPP server using Docker Compose. Thanks to it, you will be able to chat securely with all of your friends using a mature communication protocol. I will not cover all the DNS configuration, but if you need guidance for it and you read French, I’d recommend Installer son serveur XMPP avec Prosody from a friend of mine. I am still covering the TLS part (using Let’s Encrypt) so bear with me, we are starting.
The Compose directory
We will be using the official Prosody Docker image and start from the docker-compose.yml example available in the official documentation.
Remember, you can also consult my Docker Stack at any time directly on my VCS vcs.gsvd.dev/gsvd/stacks (in case the example below may be outdated).
my-docker-stack/
├── some-application/
└── prosody/
    ├── hooks/
    │   └── deploy.sh
    ├── config/
    │   ├── conf.d/
    │   │   └── example.com.cfg.lua
    │   └── prosody.cfg.lua
    └── compose.yml
Compose file
We’ll need TLS certificates for our Virtual Host. You can either choose to manage them on your host machine, or use the certbot Docker image. I’ll be covering the second option, but both are nearly identical: the most important thing is the deploy hook so you can just extract it.
compose.yml
You will need to accept incoming connections on port 80 (host machine) for certbot’s HTTP-01 challenge.
services:
  prosody:
    image: prosodyim/prosody:13.0
    pull_policy: always
    restart: unless-stopped
    ports:
      - 5222:5222 # C2S STARTTLS
      - 5269:5269 # S2S STARTTLS
      - 5281:5281 # HTTPS
      - 5000:5000 # File transfer proxy
    volumes:
      - ./config:/etc/prosody
      - certs:/etc/prosody/certs
      - data:/var/lib/prosody
    depends_on:
      certbot:
        condition: service_healthy

  certbot:
    image: certbot/certbot
    restart: unless-stopped
    volumes:
      - certs:/etc/letsencrypt
      - ./hooks/deploy.sh:/etc/letsencrypt/renewal-hooks/deploy/prosody.sh:ro
    ports:
      - "80:80"
    entrypoint:
      - /bin/sh
      - -c
      - |
        set -e
        certbot certonly --standalone \
          --agree-tos --non-interactive --keep-until-expiring \
          --email me@example.com \
          -d example.com \
          -d p.example.com \
          -d u.example.com \
          -d c.example.com
        echo '0 3 * * * certbot renew --quiet' | crontab -
        crond -f -d 8
    healthcheck:
      test: ["CMD", "test", "-f", "/etc/letsencrypt/live/example.com/fullchain.pem"]
      interval: 10s
      timeout: 5s
      retries: 30
      start_period: 5s

volumes:
  certs:
  data:
deploy.sh
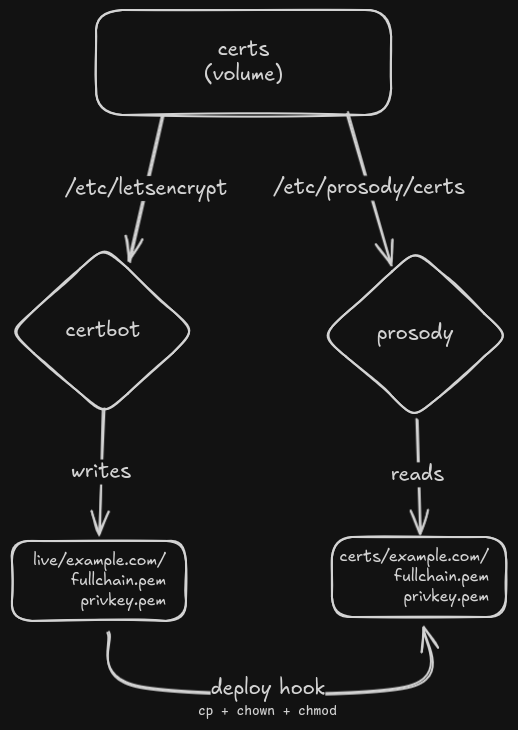
You can see that we use a Docker volume named certs for both certbot and Prosody.
But since they don’t follow the same path pattern (plus Let’s Encrypt symlinks), we have to make some copy-pasta to make it work.
As I was saying, this deploy hook is also valid on your host machine (you can maybe just adapt the paths a little).
#!/bin/sh

mkdir -p /etc/letsencrypt/example.com
cp /etc/letsencrypt/live/example.com/fullchain.pem /etc/letsencrypt/example.com/
cp /etc/letsencrypt/live/example.com/privkey.pem /etc/letsencrypt/example.com/
chmod 644 /etc/letsencrypt/example.com/fullchain.pem
chmod 640 /etc/letsencrypt/example.com/privkey.pem
chown 100:102 /etc/letsencrypt/example.com/fullchain.pem
chown 100:102 /etc/letsencrypt/example.com/privkey.pem
Let’s take some perspective on this hook:
- You are probably wondering why we are doing a
chown 100:102, because it’s the UID and GID used by the Prosody image. You can double check at any time usingdocker run --rm --entrypoint id prosodyim/prosody:13.0 prosody. - The script will be mounted into
/etc/letsencrypt/renewal-hooks/deployand will automatically be picked up by certbot after each generation and renewal. - Because it’s always better to visualize things, here is a quick diagram to explain how and why this hook exists: click to open
Common troubleshooting
If you already have a web server listening on port 80 you can change the one used by certbot to something else, for example 61248:80, and redirect using a reverse proxy.
This Nginx example will redirect the HTTP-01 challenge to the right port used by certbot in Docker.
server {
    listen 80;
    server_name example.com p.example.com u.example.com c.example.com;

    location /.well-known/acme-challenge/ {
        proxy_pass http://127.0.0.1:61248;
    }

    # You can still serve anything you want here.
    # For example, I host my own OMEMO public keys here.
    # It's useful if you have paranoid friends, for this example 404 will be enough.
    location / {
        return 404;
    }
}
Prosody configuration
prosody.cfg.lua
modules_enabled = {
    "adhoc", "admin_adhoc", "admin_shell", "announce",
    "blocklist", "bookmarks", "bosh", "carbons",
    "cloud_notify", "csi_simple", "dialback", "disco",
    "mam", "mimicking", "offline", "pep",
    "ping", "private", "register", "roster",
    "s2s_bidi", "saslauth", "smacks", "time",
    "tls", "tombstones", "uptime", "vcard_legacy",
    "version", "watchregistrations", "websocket", "welcome",
}

allow_registration = false
authentication = "internal_hashed"

c2s_require_encryption = true
s2s_require_encryption = true
s2s_secure_auth = true

pep_max_items = 12800
archive_expires_after = "3w"

log = {
    "*console";
}

Include "conf.d/*.cfg.lua"
example.com.cfg.lua
You may want to take a few minutes to check the security options I provide, I highly recommend ssl-config.mozilla.org. We are using sqlite, but you can change it to postgres if you need. It’ll require some adjustments both to the Prosody configuration and compose file (not covering it here).
VirtualHost "example.com"
ssl = {
    key = "/etc/prosody/certs/example.com/privkey.pem",
    certificate = "/etc/prosody/certs/example.com/fullchain.pem",
    ciphers = "ECDHE-ECDSA-AES128-GCM-SHA256:ECDHE-RSA-AES128-GCM-SHA256:ECDHE-ECDSA-AES256-GCM-SHA384:ECDHE-RSA-AES256-GCM-SHA384:ECDHE-ECDSA-CHACHA20-POLY1305:ECDHE-RSA-CHACHA20-POLY1305",
    protocol = "tlsv1_2+",
    curve = "X25519:prime256v1:secp384r1",
    options = {
        "cipher_server_preference",
        "no_compression",
        "no_ticket",
        "single_ecdh_use"
    }
}

authentication = "internal_hashed"
storage = "sql"
sql = { driver = "SQLite3", database = "prosody" }

Component "c.example.com" "muc"
    name = "Rooms"
    restrict_room_creation = "local"
    muc_max_rooms = 64
    muc_room_default_public = false

Component "u.example.com" "http_file_share"
    name = "Files"
    http_file_share_size_limit = 512 * 1024 * 1024       -- 512 MB per file
    http_file_share_daily_quota = 4096 * 1024 * 1024     -- 4 GB per user per day
    http_file_share_expire_after = 60 * 60 * 24 * 14     -- 14 days expire

Component "p.example.com" "proxy65"
    name = "Proxy"
    proxy65_address = "p.example.com"
    proxy65_acl = { "example.com" }
Conclusion
If you’ve done everything right, from DNS to TLS: you can just docker compose up -d. This will generate TLS certificates for your domain and boot your Prosody server.
To start chatting with your friends, create a user docker compose exec prosody prosodyctl adduser my-user@example.com and you’re good to go.
You can contact me on XMPP gsvd@gameover.sh, send me a message and tell me if this quick guide helped you!
Also, keep in mind that this article has been written without any help from AI. This is based on my own research and findings, and it describes my own approach to Compose files.
Takeaways
Of course this is not a “production-ready” tutorial. Keep in mind a few things before that:
- Backup: everything that needs to be backed up lives in the
datavolume. Don’t forget to include it in your existing backup flow. - DNS configuration, we didn’t cover it here but this step is straightforward (don’t forget this link, or the official documentation).
- Tweak the
http_file_share_*settings, I have a lot of storage so I’m quite generous. - Once your server is live, join the Prosody IM Chatroom
prosody@conference.prosody.imto say hello! {p,u,c}.example.comsubdomains are just my personal naming scheme, I’m pretty sure the convention is{proxy,upload,conference}.example.com.